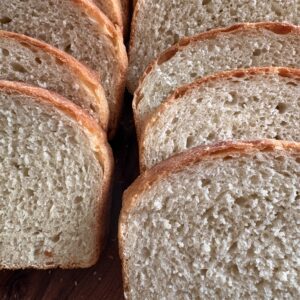
Everyday Sandwich Bread
This Everyday Sandwich Bread is soft, tender and perfect for slicing. A simple no-knead, pantry staple recipe, it requires just 15 minutes of hands-on prep time.
Ingredients
- 180 grams water, room temperature
- 180 grams milk of your choice, room temperature
- 1 tbsp honey
- 2 or 8 grams active dry yeast *amount will vary based on whether you want to do an overnight or same day rise—see notes
- 460 grams unbleached bread flour
- 9 grams kosher or fine sea salt
- Olive oil for drizzling
- Butter for coating the pan
Instructions
- Whisk together milk, water and honey (if using) then sprinkle active dry yeast across the top. Let sit for 10-12 minutes. In a large mixing bowl, whisk together flour and salt and let sit for 10 minutes.
- Add yeast mixture to flour and salt and mix, then cover and set aside for 30 minutes.
- Now we’re going to stretch and fold the dough. Using a wet hand, lift one side of the dough and fold it over and press it into the centre. Turn the bowl 45 degrees and lift from another side and fold again. Keep doing this until the dough starts to hold together, transforming from a shaggy, sticky dough into a smooth dough ball, wetting your fingers to prevent sticking as needed.
- Cover the bowl and let the dough rise at room temperature for 2 to 3 hours until it has doubled in volume. Note that the time may vary based on room temperature and environment.
- Butter a loaf pan. Using a floured hand or dough scraper, pull the dough out onto a lightly floured surface. Again, the dough will be sticky with lots of bubbly fermentation activity. It will stick to your hands and to the sides of the bowl until you turn it out onto a floured surface and start shaping it. That’s good!
- Flour your hands and/or dough scraper again and shape the dough into a loaf. Next, take one end and lift and fold 1/3 of the dough into the centre as if you were folding a letter. Repeat with the other end, then turn and place the loaf seam side down in the buttered loaf pan. If needed, lift each end from the middle and gently stretch it into the corners so the dough fills the pan. Drizzle with 1 teaspoon olive oil and rub to coat. Set aside, uncovered, to let rise for 1 hour or until the dough has risen ½ inch above the rim of the loaf pan.
- Thirty minutes before baking, position a rack to the centre of the oven and preheat the oven to 375ºF (180ºC). Bake for 45 minutes until the top is golden and it sounds hollow when you tap on the top. Turn loaf out onto a wire cooling rack and let cool completely before slicing.
Notes
Measurements: As always, I recommend using a digital scale to measure your ingredients for accuracy. The one I use is highly rated and reasonably priced, and it really is a foolproof way to ensure your ingredient measurements are correct.
Flour: I make all my breads using high-protein bread flours. Other flours may be substituted with varying results, including good quality, gluten-free bread flour blends.
Yeast: I prefer to bake with active dry yeast. If using instant yeast, add it directly to the dry ingredients. If baking overnight, use 2 grams (½ teaspoon) of yeast. To make it same day, use the 6 grams (2 teaspoons) indicated above.
Salt: I prefer to bake with kosher salt. Diamond Crystal Kosher Salt is my go-to and what I use in almost all my recipes. Fine sea salt is a great alternative. It’s important to note that when cooking or baking with salt the quantity you use will vary depending on type and brand. As a general rule, if using Morton’s kosher salt, which has a coarser texture, double it. If using table salt, reduce by half.
Stretch and folds: For this recipe, I’ve added a set of stretch and folds to the method to help strengthen the gluten. The result is a stronger, more airy dough and the loftier rise that comes to mind when we think of traditional sandwich breads.
Rise time: Rest times may vary according to room temperature and environmental conditions. With a little practice, you will find the timing that works best for you.
Hydration: This is an 80% hydration dough. After the first rise, it will be sticky with lots of bubbly fermentation activity. It will stick to your hands and to the sides of the bowl until you turn it out onto a floured surface and start shaping it. That’s good! Rest assured that once you do, it will come together quickly.
Bake it in under 5 hours or let it rise overnight: I tend to prefer the ease and fuller flavour that come with an overnight rise. The night before, I usually start around 8 pm, doing a quick set of stretch and folds around 9 pm and letting it rise overnight. *See note on yeast above if you’d like to do this.
Storage: This bread will keep well sealed on the counter for 3-4 days or in the fridge for up to a week. Sliced bread will freeze well in an airtight container or freezer bag for several months.